
- Take the hassle out of finding a Violin Teacher Online!
- Learn Anything Quickly and Easily Audiobook – Subliminal Guruaudible.co.ukChoose from the world’s largest selection of audiobooks. Start a free trial now.
- Twilight Violin Music – at Amazon.co.ukwww.amazon.co.ukLow Prices on Twilight Violin Music
Ads
Learn how to play violin quickly and easily with this beginner violin lesson and song tutorial7 years agoyoutube.comHow to Learn to Play the Violin or Viola as Fast as a Child?7 years agoyoutube.comLearning to play fast on the violin – G major scale.mov9 years agoyoutube.comLearn to Play Violin || Learn Quick4 years agoyoutube.comLearn how to play the violin: FAST. What do you REALLY need to start playing10 months agoyoutube.comLearn To Play The Violin in 1 (one) Hour!! YES – in one whole hour!!!7 years agoyoutube.comViolin Techniques – Learning how to play FASTER1 year agoyoutube.com

Adobe Photoshop’s ‘Super Resolution’ Made My Jaw Hit the Floor
Mar 13, 2021 Michael Clark ShareTweet
194 Comments
Adobe just dropped its latest software updates via the Creative Cloud and among those updates is a new feature in Adobe Camera Raw (ACR) called “Super Resolution.” You can mark this day down as a major shift in the photo industry.
I have seen a bit of reporting out there on this topic from the likes of PetaPixel and Fstoppers, but other than that the ramifications of this new feature in ACR have not been widely promoted from what I can see. The new Super Resolution feature in ACR essentially upsizes the image by a factor of four using machine learning, i.e. Artificial Intelligence (AI).
The PetaPixel article on this new feature quoted Eric Chan from Adobe:
Super Resolution builds on a technology Adobe launched two years ago called Enhance Details, which uses machine learning to interpolate RAW files with a high degree of fidelity, which resulted in images with crisp details and fewer artifacts. The term ‘Super Resolution’ refers to the process of improving the quality of a photo by boosting its apparent resolution,” Chan explains. “Enlarging a photo often produces blurry details, but Super Resolution has an ace up its sleeve: an advanced machine learning model trained on millions of photos. Backed by this vast training set, Super Resolution can intelligently enlarge photos while maintaining clean edges and preserving important details.
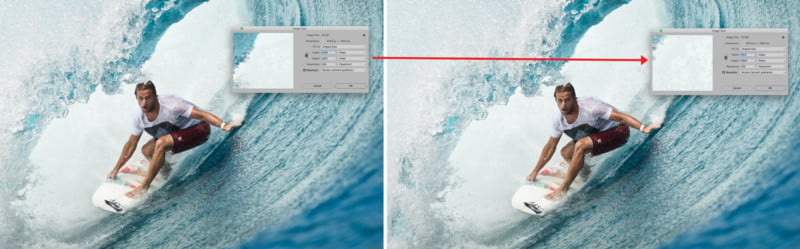
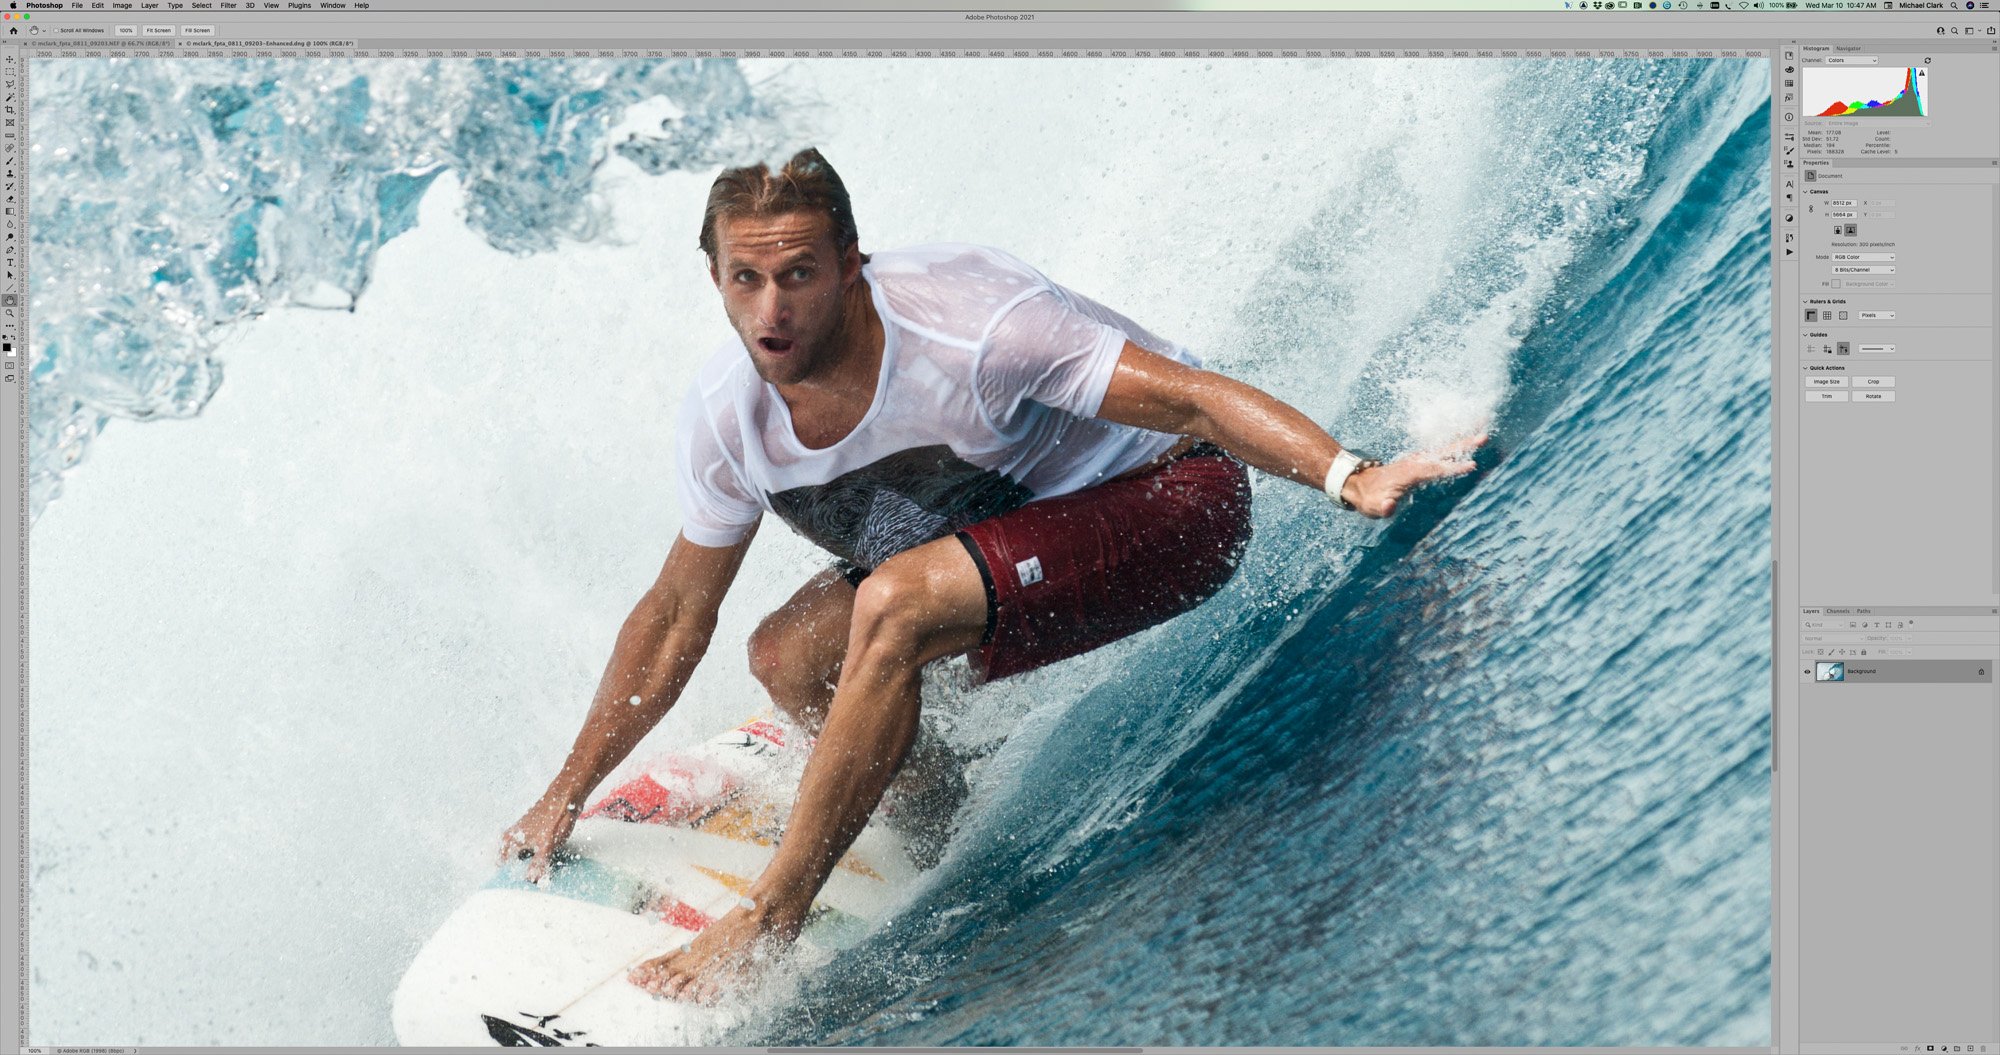
What does this mean practically? Well, I immediately tested this out and was pretty shocked by the results. Though it might be hard to make out in the screenshot below, I took the surfing image shown below, which was captured a decade ago with a Nikon D700 — a 12MP camera — and ran the Super Resolution tool on it and the end result is a 48.2MP image that looks to be every bit as sharp (if not sharper) than the original image file. This means that I can now print that old 12MP image at significantly larger sizes than I ever could before.

What this also means is that anyone with a lower resolution camera, i.e. the current crop of 24MP cameras, can now output huge image files for prints or any other usage that requires a higher resolution image file. In the three or four images I have run through this new feature in Photoshop I have found the results to be astoundingly good.
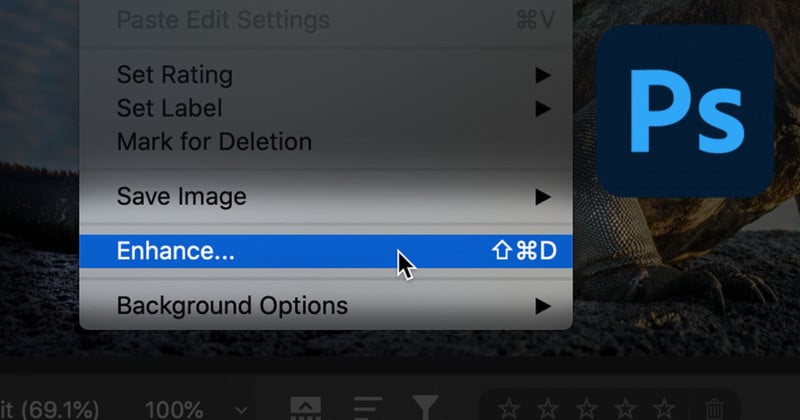
Let’s run through how this works. First off, it works with any image file, whether it is a raw images file, a TIFF, or a JPEG. You will have to open the image file in Adobe Camera Raw via Photoshop or Adobe Bridge as shown below. To access the Super Resolution feature, right-click on the image and choose “Enhance” as shown below.
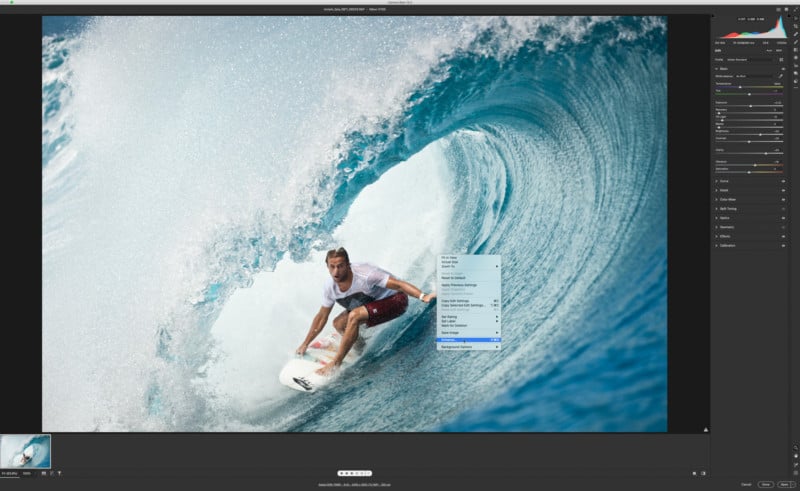
A dialog window will come up so you can see how the image will look and you can also toggle back and forth between the original image and the new Enhanced version. The dialog will give you an estimate on how long it will take to create the new Enhanced image, which will show up as a separate image file. Once you are ready simply click the Enhance button in the lower right-hand corner. ACR starts working in the background immediately to build the new image file and it eventually appears right next to the original file you selected wherever that one is stored.
In my testing, as shown below, it took this old 12MP image from 4256×2832 pixels to 8512×5664 pixels. The screenshots below show this enlargement. The top image is the lower resolution (original) version and the bottom image is the one that went through the Super Resolution process. The higher-res image looks absolutely amazing. And at 48MP I could easily blow this up to a 40×60 inch print just as with any image captured using my 45MP Nikon D850.
Once I upsized the image using the Super Resolution feature, I zoomed into the resulting image and was very impressed. The image seemed just as sharp (if not a little sharper) as the original image file but of course it is massively larger (in terms of resolution and file size). Kudos to the folks at Adobe for creating a truly revolutionary addition to Photoshop. I have tried some of the Topaz AI software options, like Topaz Gigapixel AI, but I have not seen it work this well.
So what does this mean? For starters, it means that AI technology will have a huge impact on photography. Going forward, the software we use to work up our images (and upres them) might in some instances have a larger effect on the final images than the camera that was used to capture the image.
To a certain degree, this new tool in Photoshop significantly equalizes the playing field no matter what camera you are working with. All of a sudden my Nikon Z6 and Fujifilm X-Pro3 (respectively 24MP and 26MP cameras) are capable of producing stunning large prints in a way that was previously just not possible.
What about high-resolution cameras you may ask? Where do they end up with all of this? The new Super Resolution tool will allow up to upres any image as long as the resulting “Enhanced” image file is less than 65,000 pixels on the long side and under 500MP in total. What that means is I can upres the 102MP images from my Fujifilm GFX 100 and GFX 100S cameras and produce insane 400MP image files from a single image. That is getting into the absurd, but that also opens some doors for crazy huge prints.
The reality is that this feature is a huge boon to lower resolution (12MP to 16MP) and even medium resolution (24MP) camera owners. Higher resolution cameras will still yield better image quality but we now have the option of making large prints from relatively low-resolution image files.
Enhancing a Photo to 376 Megapixels
After talking with some photographer friends about this new feature I played around with images from a variety of different cameras to see how it varies. I ran a few images through from my Nikon Z6 and also a few from my Fujifilm GFX 100. With the GFX 100 image, the Super Resolution feature popped out a 376MP image file that was damn near identical to the original image file, just four times larger. My jaw hit the floor when I zoomed into 100% and compared it to the original! You can see both the original and the Enhanced images below. There is no way to actually convey the 100% image size here as I have no control over the viewer’s screen resolution but regardless, they both look wicked sharp.
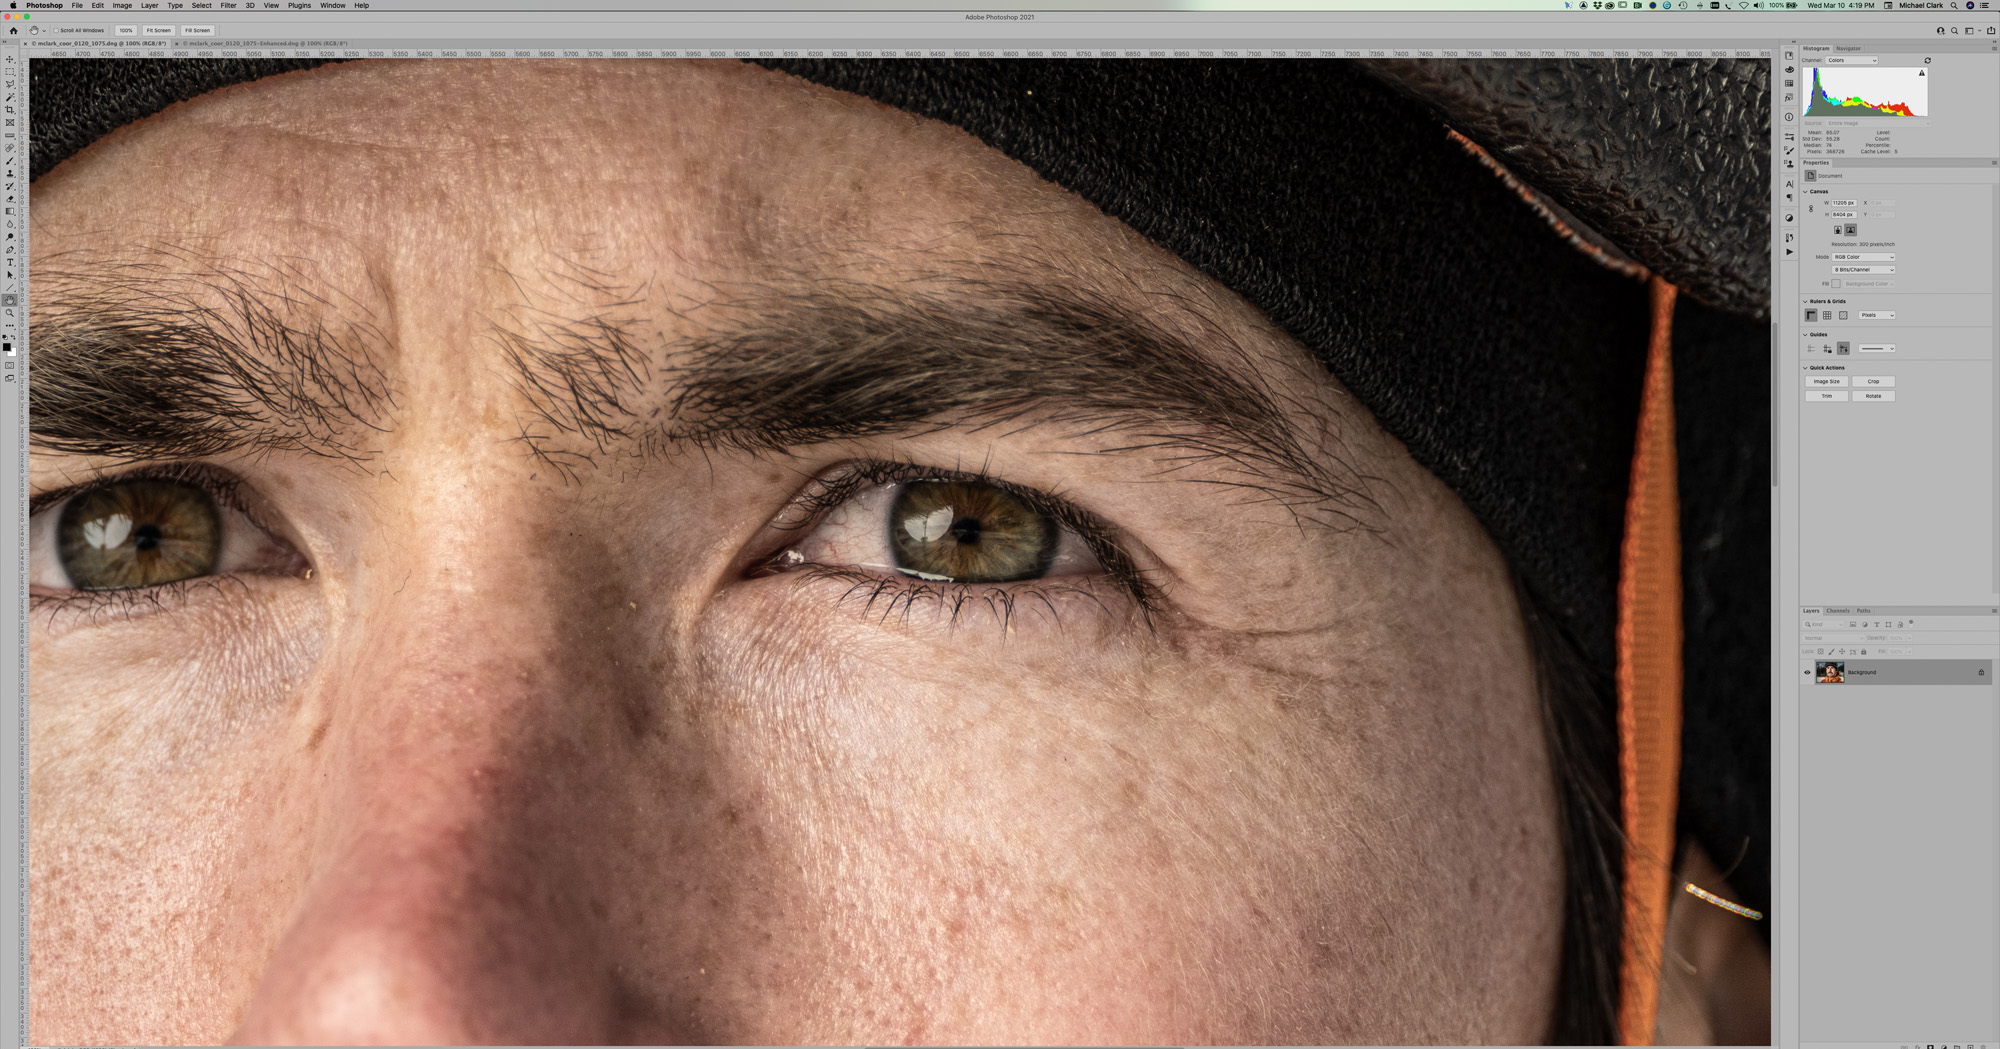

From what I can tell, the Super Resolution tool seems to do an even better job with higher resolution cameras and in particular with cameras that do not have an anti-aliasing filter in front of the sensor. My Nikon Z6 images when enhanced with this tool still look impressive but not as jaw-dropping as the example above. The Z6 has a very strong anti-aliasing filter, basically a filter that slightly blurs the image to reduce digital artifacts. In addition, it seems like the amount of sharpening or noise reduction applied to the image is also magnified so playing around with how the image is worked up may have a significant effect on the final image quality. I will have to do some more testing.
If you have gotten this far, and are still reading this full-on pixel-peeping madness, then you might have realized that this could be the best upgrade to any and every camera ever. This is certainly one of the most incredible features Adobe has ever released in Photoshop.
This is just the start of the AI revolution. It also shows quite clearly that many of the advancements in image quality are going to come from the software side of the equation as we start to see cameras with incredible specs that might be hard to dramatically improve upon in the coming years. I am super excited about this new option in Photoshop as it will allow me to offer much larger prints than I have been able to create previously–and they will look stunning.
Adobe Photoshop’s ‘Super Resolution’ Made My Jaw Hit the Floor
Mar 13, 2021 Michael Clark ShareTweet
194 Comments
Adobe just dropped its latest software updates via the Creative Cloud and among those updates is a new feature in Adobe Camera Raw (ACR) called “Super Resolution.” You can mark this day down as a major shift in the photo industry.
I have seen a bit of reporting out there on this topic from the likes of PetaPixel and Fstoppers, but other than that the ramifications of this new feature in ACR have not been widely promoted from what I can see. The new Super Resolution feature in ACR essentially upsizes the image by a factor of four using machine learning, i.e. Artificial Intelligence (AI).
The PetaPixel article on this new feature quoted Eric Chan from Adobe:
Super Resolution builds on a technology Adobe launched two years ago called Enhance Details, which uses machine learning to interpolate RAW files with a high degree of fidelity, which resulted in images with crisp details and fewer artifacts. The term ‘Super Resolution’ refers to the process of improving the quality of a photo by boosting its apparent resolution,” Chan explains. “Enlarging a photo often produces blurry details, but Super Resolution has an ace up its sleeve: an advanced machine learning model trained on millions of photos. Backed by this vast training set, Super Resolution can intelligently enlarge photos while maintaining clean edges and preserving important details.
What does this mean practically? Well, I immediately tested this out and was pretty shocked by the results. Though it might be hard to make out in the screenshot below, I took the surfing image shown below, which was captured a decade ago with a Nikon D700 — a 12MP camera — and ran the Super Resolution tool on it and the end result is a 48.2MP image that looks to be every bit as sharp (if not sharper) than the original image file. This means that I can now print that old 12MP image at significantly larger sizes than I ever could before.
What this also means is that anyone with a lower resolution camera, i.e. the current crop of 24MP cameras, can now output huge image files for prints or any other usage that requires a higher resolution image file. In the three or four images I have run through this new feature in Photoshop I have found the results to be astoundingly good.
Let’s run through how this works. First off, it works with any image file, whether it is a raw images file, a TIFF, or a JPEG. You will have to open the image file in Adobe Camera Raw via Photoshop or Adobe Bridge as shown below. To access the Super Resolution feature, right-click on the image and choose “Enhance” as shown below.
A dialog window will come up so you can see how the image will look and you can also toggle back and forth between the original image and the new Enhanced version. The dialog will give you an estimate on how long it will take to create the new Enhanced image, which will show up as a separate image file. Once you are ready simply click the Enhance button in the lower right-hand corner. ACR starts working in the background immediately to build the new image file and it eventually appears right next to the original file you selected wherever that one is stored.
In my testing, as shown below, it took this old 12MP image from 4256×2832 pixels to 8512×5664 pixels. The screenshots below show this enlargement. The top image is the lower resolution (original) version and the bottom image is the one that went through the Super Resolution process. The higher-res image looks absolutely amazing. And at 48MP I could easily blow this up to a 40×60 inch print just as with any image captured using my 45MP Nikon D850.
Once I upsized the image using the Super Resolution feature, I zoomed into the resulting image and was very impressed. The image seemed just as sharp (if not a little sharper) as the original image file but of course it is massively larger (in terms of resolution and file size). Kudos to the folks at Adobe for creating a truly revolutionary addition to Photoshop. I have tried some of the Topaz AI software options, like Topaz Gigapixel AI, but I have not seen it work this well.
So what does this mean? For starters, it means that AI technology will have a huge impact on photography. Going forward, the software we use to work up our images (and upres them) might in some instances have a larger effect on the final images than the camera that was used to capture the image.
To a certain degree, this new tool in Photoshop significantly equalizes the playing field no matter what camera you are working with. All of a sudden my Nikon Z6 and Fujifilm X-Pro3 (respectively 24MP and 26MP cameras) are capable of producing stunning large prints in a way that was previously just not possible.
What about high-resolution cameras you may ask? Where do they end up with all of this? The new Super Resolution tool will allow up to upres any image as long as the resulting “Enhanced” image file is less than 65,000 pixels on the long side and under 500MP in total. What that means is I can upres the 102MP images from my Fujifilm GFX 100 and GFX 100S cameras and produce insane 400MP image files from a single image. That is getting into the absurd, but that also opens some doors for crazy huge prints.
The reality is that this feature is a huge boon to lower resolution (12MP to 16MP) and even medium resolution (24MP) camera owners. Higher resolution cameras will still yield better image quality but we now have the option of making large prints from relatively low-resolution image files.
Enhancing a Photo to 376 Megapixels
After talking with some photographer friends about this new feature I played around with images from a variety of different cameras to see how it varies. I ran a few images through from my Nikon Z6 and also a few from my Fujifilm GFX 100. With the GFX 100 image, the Super Resolution feature popped out a 376MP image file that was damn near identical to the original image file, just four times larger. My jaw hit the floor when I zoomed into 100% and compared it to the original! You can see both the original and the Enhanced images below. There is no way to actually convey the 100% image size here as I have no control over the viewer’s screen resolution but regardless, they both look wicked sharp.
From what I can tell, the Super Resolution tool seems to do an even better job with higher resolution cameras and in particular with cameras that do not have an anti-aliasing filter in front of the sensor. My Nikon Z6 images when enhanced with this tool still look impressive but not as jaw-dropping as the example above. The Z6 has a very strong anti-aliasing filter, basically a filter that slightly blurs the image to reduce digital artifacts. In addition, it seems like the amount of sharpening or noise reduction applied to the image is also magnified so playing around with how the image is worked up may have a significant effect on the final image quality. I will have to do some more testing.
If you have gotten this far, and are still reading this full-on pixel-peeping madness, then you might have realized that this could be the best upgrade to any and every camera ever. This is certainly one of the most incredible features Adobe has ever released in Photoshop.
This is just the start of the AI revolution. It also shows quite clearly that many of the advancements in image quality are going to come from the software side of the equation as we start to see cameras with incredible specs that might be hard to dramatically improve upon in the coming years. I am super excited about this new option in Photoshop as it will allow me to offer much larger prints than I have been able to create previously–and they will look stunning.
About the author: Michael Clark is an internationally published outdoor photographer specializing in adventure sports, travel, and landscape photography. The opinions expressed in this article are solely those of the author. Clark contributes to National Geographic, National Geographic Adventure, Sports Illustrated, Outside, Men’s Journal, Backpacker, Outdoor Photographer, Digital Photo Pro, Climbing, Alpinist, Rock and Ice, Bike Magazine and The New York Times among many others. You can find more of Clark’s work on his website, Facebook, Twitter, and Instagram. This article was also published here. Tags: adobe, adobecameraraw, adobephotoshop, enhance, feature, photoshop, review, superresoluti
About the author: Michael Clark is an internationally published outdoor photographer specializing in adventure sports, travel, and landscape photography. The opinions expressed in this article are solely those of the author. Clark contributes to National Geographic, National Geographic Adventure, Sports Illustrated, Outside, Men’s Journal, Backpacker, Outdoor Photographer, Digital Photo Pro, Climbing, Alpinist, Rock and Ice, Bike Magazine and The New York Times among many others. You can find more of Clark’s work on his website, Facebook, Twitter, and Instagram. This article was also published here. Tags: adobe, adobecameraraw, adobephotoshop, enhance, feature, photoshop, review, superresoluti
Can you Learn to Play on an Electric Violin, Viola or Cello?
7 years agoyoutube.com

Google: Yahoo: MSN: This free script provided by JavaScript Kit | Writing and Selling Erotic Fiction by Catherine Lundoff Return to Writing Romance · Print/Mobile-Friendly Version Erotica is any literary or art form that arouses sexual desire or even love in an audience. Put simply, erotic writing is writing that has the potential to turn your reader on. That’s a nice broad definition, limited only by the range of your potential readers’ desires. Given this range, erotic writing can encompass any aspect of sensuality, from the sensual depiction of a hot bath to descriptions of an explicitly sexual act. Erotic literature is a growing field and one that spans a multitude of genres, as well as being one unto itself. There is erotic horror, science fiction and fantasy erotica, literary erotica and erotic romance, just to name a few genres that are receptive to erotic writing. There are also sizable markets specifically for heterosexual, gay, and lesbian erotica, as well as a smaller number for bisexual and transgender erotica. “Sex sells” is a saying that’s been around forever and for once, it’s true. Saleability isn’t the only reason to write erotica, however. Writing erotica can improve other types of writing that you do by honing your descriptive skills and your awareness of how your characters occupy physical space in your stories. You’re writing for impact so story line, characters and word choice have to work together even more closely than in many other types of fiction writing in order to be effective. All of this will serve you well if you go on to write in other nonerotic genres. In order to have the most impact, your literary erotica needs to be more than just a long sex scene. For one thing, most editors and readers are going to want your story to have some sort of plot to make it more interesting. For another, since you are somewhat limited by the human body, you’re unlikely to come up with a sexual or sensual description so wildly original that no one has ever written anything like it before. Make your story stand out with interesting characters and story lines instead. These should carry your story line forward, not the sexual situation alone. Below are some questions to ask yourself about your erotic writing. If you can’t answer these questions or the answer is no, it’s time to go rewrite: Is there a story without the sexual angle? It is erotica, after all, so you have to have erotic elements to your story but they shouldn’t be standing alone. Do the erotic elements move the story forward? How does the sensual/sexual scene affect you/your reader? Finish your story, then take some time away from it. Then go back and reread it or better yet, have someone you trust read it. Does it have an impact on them? On you? Is it what you’re striving for? Good word choices and descriptions are crucial for effective erotic writing. Adjectives and euphemisms for genitalia and sex acts are frequently used as building blocks for erotic fiction. When handled appropriately, they can help give your story a romantic gloss that might otherwise be missing. More often than not, they’re overused and will make your story appear downright silly. Prune your adjectives and read some erotic scenes and novels you like to get an idea of how other writers do it. As a general rule, it’s better to avoid euphemisms, especially when you are first starting out; a few well placed metaphors can be a lot more useful in conveying your images. Erotic fiction depends on the physical actions and sensations of your characters for impact. Educate yourself about anatomy and any sexual activities you want to write about so you can write more effectively. Read your story out loud and check to see if something seems physically impossible or just plain uncomfortable. If so, it’s going to make your erotica less appealing to your potential readers. Remember that this is fiction, not thinly disguised memoir: try not to use your sex life as the basis for your fiction. Certainly, it can be inspirational but it shouldn’t be where you get all your ideas. That road can lead to law suits or reduced dating prospects at the very least. Should you use a pseudonym for your erotica? It depends. There is some danger that you will be taken less seriously as a writer because of the prevailing belief that writing about sex is “easy” and/or autobiographical. Some writers choose pseudonyms for this reason. Others use them if they write in other genres (such as children’s books) or if they are concerned that it may negatively impact their daily lives. On the other hand, if you want to make a career out of erotic fiction, using your own name can make marketing easier. Ultimately, you’re the only one who decides if erotic writing is for you so how or if you tell others is your personal decision. Any professional editor interested in publishing your work will respect your choice either way. The majority of the literary erotica published in books, magazines and websites is in short story form. But don’t despair if you want to write novels or plays or something else. There are a number of presses and markets out there to choose from, ranging from Circlet Press (science fiction and fantasy) to Random House and Penthouse. Novels are a comparative rarity because they are more difficult to write than erotic short fiction. This is due to erotica’s dependence on impacting the reader: it’s just harder to sustain an impact-laden story line and a series of sensually related events than to write one or two into the same story. Some writers are very successful at it, however, and there’s no reason you can’t be among them. Before you submit anything, it’s also important to recognize that most erotica publishers have certain kinds of stories that they are not interested in reading. These often include stories that involve rape, particularly that of children, bestiality and almost any sex act involving actual children (as opposed to role playing between adults). Some publishers will go further and request that authors concentrate on depicting safe sex while others will not look at any story that depicts any form of sadomasochism. These guidelines may arise from moral beliefs or fear of legal action and bad press, but either way, if they say they won’t read it, don’t send it. Always, always check the editorial guidelines before you submit. You don’t have to look very far to find examples of good erotic writing. Even mainstream literature is filled with “the good bits,” the erotic paragraphs and scenes that tend to get dog-eared and read over and over again. In addition, many famous and well established writers have written works that are entirely erotic in nature, including Anaïs Nin, Anne Rice, Ramsey Campbell, Henry Miller, Samuel Delany and D.H. Lawrence, to name just a few. Other writers like Cecilia Tan, Pat Califia and Erica Jong specialize in erotic writing. The aspiring writer has only to look around to find examples of almost type of story he or she could want to write or read. Get familiar with some of the work that is already out there to see how established authors write about sex and sensuality. There are a number of resources out there to help you get started on writing and marketing erotica. Erotica editor and sexuality expert Susie Bright’s “How to Write a Dirty Story: Reading, Writing, and Publishing Erotica,” published by Fireside Press, is a good introductory book. It includes recommended readings, writing exercises and other resources that are helpful to the new erotic writer. The Erotic Readers and Writers Association website includes how to articles, reviews, a chat room, and best of all, up to date market lists of anthologies, magazines and publishers. There are also some publishers that include calls for submissions on their websites. Circlet Presspublishes science fiction and fantasy erotica anthologies and novels; be sure to doublecheck the reading period before submitting. Alyson Books, a publisher of gay, lesbian and bisexual titles including erotica, has a call for submissions page. Red Sage Publishing’s Secrets Collection are anthologies of novella length erotic romances for women. Unbound Books publishes erotic novels for a variety of interests. Remember that this list is just a starting place. Check the market listings noted above for other opportunities. Finally, once you’ve made a sale for $5 or more, there’s a new professional organization for erotica writers, The Erotic Author’s Association. These are only a few of the resources that are out there; check around for links off the websites and see what publishers are printing your favorite erotica writers. But most important of all, keep on writing! Find Out More… Is Erotica Right for You? by Tracy Cooper-Posey https://www.writing-world.com/romance/romantica.shtml Writing Erotic Mysteries, by Michael Bracken https://www.writing-world.com/mystery/eroticmyst.shtml Helpful Sites: Erotic Readers and Writers Association http://www.erotica-readers.com Alyson Books http://www.alyson.com Circlet Press http://www.circlet.com Copyright © 2002 Catherine Lundoff This article may not be reprinted without the author’s written permission. Catherine Lundoff has written and published in several genres, including erotica, science fiction and fantasy, romance and nonfiction. She is a member of both Romance Writers of America and Science Fiction and Fantasy Writers of America. Her erotic short fiction has appeared in a number of anthologies, including The Mammoth Book of Best New Erotica, Best Lesbian Erotica 2005,Best Lesbian Erotica 2001, Erotic Travel Tales 2, Electric 2: Best Lesbian Erotic Fiction, That’s Amore!: Four Erotic Romance Novellas, and The Big Book of Hot Women’s Erotica 2004. Check out her website at http://catherinelundoff.com/. Copyright © 2021 by Moira Allen. All rights reserved. All materials on this site are the property of their authors and may not be reprinted without the author’s written permission, unless otherwise indicated. For more information please contact Moira Allen, Editor Please read our new Privacy Statement. |   |
Everything to Know about the Grand Canyon Skywalk Glass Bridge
Tori PeglarOct 18, 2019

Walk on a glass bridge suspended over the Grand Canyon
Courtesy Grand Canyon West
Towering 4,000 feet above the Grand Canyon is the $30-million Skywalk, a horseshoe-shaped glass walkway. Built in 2007, the Skywalk gives you the feeling you are walking on air. In fact, you’ll see some tourists anxiously grab the handrails with their eyes shut. Don’t miss the exhibits on Hualapai history inside the Skywalk building.
Visiting Grand Canyon West, which is not part of Grand Canyon National Park, requires the purchase of a tour package for entry. A tour package must be purchased first in order to add any options such as the Skywalk, helicopter and boat rides, horseback rides and more.
Where is the Grand Canyon Glass Bridge?
The Grand Canyon Skywalk is NOT located near the South or North Rim of Grand Canyon National Park. Rather it is located at Grand Canyon West, on reservation land owned by the Hualapai Indian Tribe.
The Skywalk is about 120 miles east of Las Vegas, NV, and 70 miles north of Kingman, AZ. It can also be accessed via the Grand Canyon West Airport.
How to Get to the Grand Canyon Skywalk
It can be an adventure to get there, and it’s not cheap. Still, it’s a one-of-a-kind way to experience the country’s most famous natural wonder.
By personal car or rental car, go to Kingman in northwestern Arizona, which can be accessed by Interstate 40 or Highway 93. At Kingman, follow Highway 93/E Andy Devine Ave/B-40/Historic 66 for three or four miles, then continue on W Beale St/US-93 for a little more than 29 miles. Turn right at W Pierce Ferry Road and travel seven miles to Dolan Springs, where the Grand Canyon West Welcome Center is located. From there, it’s 14 miles to the Skywalk.
Visitors can take a “Park and Ride” shuttle/coach from the Welcome Center. Reservations are required, though, by calling 877-716-WEST, or email reservations@grandcanyonresort.com.
Packages are available that include Park and Ride Shuttle reservations and Skywalk fees. One popular one is the Sky Package which includes roundtrip Park and Ride Shuttle, plus a walk out on the Skywalk. Other more advanced packages include horseback rides, river trips or helicopter tours.
Entrance Fees to the Grand Canyon Skywalk
A Hualapai Legacy Day Pass to Grand Canyon West includes an official Hualapai visitation certificate, photo opportunities with Hualapai tribal members and hop-on hop-off shuttle to all viewpoints, including Hualapai Ranch, Eagle Point, and Guano Point. It does not include a walk on the Skywalk. To walk across the Skywalk, you will need to pay for the Legacy Gold package that includes a meal. Order tickets online at grandcanyonwest.com
Waiting in Lines
Especially during peak season (summer), visitors should be prepared to wait in line for their turn to experience the Skywalk. This is a popular attraction that is becoming only more popular.

Learn about Hualapai culture while waiting for your turn on the Skywalk
Courtesy Grand Canyon West
Cameras on the Skywalk
No cameras are allowed out on the Skywalk, but visitors can be photographed while on the Skywalk from a group member that is not on the Skywalk. In addition, a photo opportunity is available with authentic Hualapai Tribe members is included with every tour package, and photos can be purchased afterward.
Operation Hours of the Skywalk
Although Grand Canyon West is open and accessible year-round, and the Skywalk is open from dawn until dusk, hours of operation for Skywalk vary depending on time of year. During Winter (mid-October to mid-April), the Skywalk is open from 8:00 am to 4:30 pm. During Summer (May 1 to mid-October), the Skywalk is open from 7 a.m. to 8 p.m.
History of the Skywalk Bridge
The Grand Canyon Skywalk cost $30 million to construct and was funded by Hualapai Indian tribe in partnership with Chinese-American businessman David Jin. Built to withstand 100 mph winds, the Skywalk’s frame was constructed with 100 million pounds of steel.
Founder Jin describes his vision for the Skywalk this way: “Just like an eagle can fly into the Grand Canyon, my vision was to enable visitors to walk the path of the eagle, and become surrounded by the Grand Canyon while standing at the edge of the Glass Bridge.
“The Bridge gives us a chance to share the wonder of the Canyon that the Hualapai Tribe has graciously offered. My dream was to find a balance between form, function and nature.”
For more information:
grandcanyonwest.com
How to Sell Your Screenplay
- Query Letters
- Loglines
- Synpopses
- Treatments
QUERY LETTERS, LOGLINES, SYNOPSIS, AND TREATMENTS
You already learned how to write a screenplay. Now its time talk about how to get your screenplay in front of agents, managers and producers.
.jpg?width=300&name=SpecBook_TopBanner2_190410%20(1).jpg)
What is a query letter?
A query letter is usually a one-page letter or e-mail that you send out to agents, managers and producers to try and entice them to read your script.
What is a logline?
A logline is usually the first thing in a query letter and is the most vital piece of the message. It is usually 1 or 2 sentences long.
What is a synopsis?
A synopsis is a short summary of your script, usually a half-page long, and is used in some query letters. If not included in the letter, it will sometimes be requested by industry players after reading your logline.
What is a treatment?
A treatment is a document that details your movie script from beginning to end, and can be requested by industry players in a number of very different scenarios. It is more useful as a writing tool than anything else.
With that quick primer out of the way, let me tell you:
Secret #1: The most important of all four of the above is the logline. You will need the logline for more people, in more situations, and it will be the most read or heard thing about your story – far more so than your actual script.
Think of your logline as a 5 to 10-second pitch. Whether delivered in a sentence or two in a letter or email, or whether you just bumped into a producer at Urth Caffé, it’s the one or two sentences you say or write most about your screenplay.
Secret #2: As a manager, I never once asked to read a synopsis or treatment. Nobody in the industry has any time, and if someone can’t write a good query letter or logline, we figure they can’t write a script. It takes more time to read a synopsis than it does to read the first few pages of a script. And seasoned pros can tell if you’re a good writer from just a few pages.
Secret #3: Make sure those first 5 pages of your screenplay are absolutely stellar and attention-grabbing – even if they just showcase how brilliantly you write on a technical level. Those 5 pages make or break whether anyone reads any further in your script.
QUERY LETTERS
Okay, so let’s talk about query letters. Most books will tell you to write a one-page query letter that includes a logline that’s 1 to 3 sentences long, a short synopsis, and a bio of yourself. From my experience as a manager, that exercise is a total waste of time. Since all I care about is the logline, give me a professional greeting, a logline, and a professional exit. Let the logline speak for itself, the rest is fluff.
Now, my only caveat with not including any bio information is if you’ve won any prestigious screenwriting competitions, or if your occupation has anything to do with the story at hand. For instance, if your day job is as a detective and you wrote a murder mystery, include that information. That kind of background lends an air of credibility and is the only time it’s worth writing a short bio.
LOGLINES
Before I go over how to execute a perfect logline, let’s clarify first what a logline SHOULD be – what it should LOOK like, READ like, and FEEL like.
Some books say you should write a short, 1 to 3-sentence paragraph to tell the reader your script’s story. I say, bulls%$^. You write ONE sentence, and ONE sentence only, and you SELL the reader on why he or she should read your script.
Let me repeat that: Your goal with a logline is not to talk about or encapsulate the story in an exciting way. Instead, a logline is meant to highlight the aspects of your script that would entice someone who didn’t give a crap two seconds ago into wanting to read or know more.
If you can write one sentence that entices the reader to want to read your script AND also gives some semblance of what the story will be, you’ve written the perfect logline.
The Way The Books Teach You To Write A Logline:
When JACK wins a trip on the maiden voyage of the Titanic, he finds himself in a world he’s unprepared for. Amidst the opulence of the ship, he falls in love with ROSE, an upper-class girl about to be married off to the villainous CAL. Will love conquer all?
Not bad, right? It could use some polish (“villainous Cal” sounds cheesy), but as far as textbook loglines go, nothing stands out as terrible about it. What if you wrote something as simple as:
A journey of forbidden love between a poor boy and a rich girl on the final voyage of the RMS Titanic.
Now, the second logline isn’t perfect – but it highlights A: the love story, B: the historic and tragic setting, and C: just from that one sentence, we know what the movie’s story might be like. We excised ALL unnecessary words and details, and kept it brisk, HIGH CONCEPT, and mysterious enough to warrant a read.
Notice I didn’t go into any detail – the object of a logline is to whet someone’s appetite. You’re trying to bait them with the mystery – what happens? How does it happen? If you TELL them too much, they won’t have any questions in their mind, and thus, have less reason to read your script to find out.
So, never ever TELL the story. SELL the story.
SYNPOPSIS
.jpg?width=300&name=linkedin-sales-navigator-EI50ZDA-l8Y-unsplash%20(1).jpg)
Writing a synopsis is really only useful for two reasons:
Having it on hand in case anyone (and hardly anyone will) asks for it.
If you write it before starting your script, it helps you narrow down what the most important aspects of your story will be.
Other than that, there is no real practical application to writing a synopsis when it comes to interacting with industry people.
TREATMENTS
Lastly, for an aspiring writer, there is only one good use for a treatment: To help you plan out your script, beat by beat, from beginning to end, BEFORE you start writing it.
Treatments have no other practical use for unknown writers because the only other time a treatment will become necessary is once you’ve become an established Hollywood screenwriter. For instance, you may have read stories about people, like my first client Travis Beacham, who sold a treatment for tons of money (http://www.deadline.com/2010/05/legendary-pictures-re-teams-with-clash-of-the-titans-scribe-on-pacific-rim/), but the only reason that happens, off just a treatment, is because he’s an established writer with credits on big movies and a studio didn’t want to pass up the next big tentpole film.
The only other time a treatment will become necessary is if you’ve sparked interest in a producer or executive because of a script you wrote, and they’ve asked you to come in and talk about your other ideas. In this scenario, DO NOT – under any circumstances – leave behind a treatment to read. Hollywood desks are littered with paper, and adding to the pile will only get your treatment, eventually, into the trash. If you excite them enough with your ideas, they’ll pitch what you pitched them to their boss (since they don’t have any paper with the idea written on it), and if the boss likes it, you get invited back to meet him. That’s the goal – not a treatment making its way around the office.
So. remember what the role of each of these four writing tools is – and use them to your advantage.
In the world of an unknown writer, your logline is king. It will either make people want to read your script or flee the kingdom. It’s up to you to finesse it into shape and then get it out to the industry.
Good luck, and if you have any questions please feel free to email me at info@scriptawish.com.
Happy Writing!
Want more?
Exclusive Lease Offers, Flexible Terms, Lowest Rates and Part Ex. Welcomed Best Lease Deals | New Cars – Used Cars | No Deposit Leasing | Bad Credit | Automatics | SUV Cars | Hybrid Cars |
| Audi A1 Best Car Leasing Deal from £138.95 per month Nissan Qashqai Best Car Leasing Deal from £149.02 per month Mercedes A Class Best Car Leasing Deal from £157.27 per month Audi A3 Best Car Leasing Deal from £162.72 per month Land Rover Evoque Best Car Leasing Deal from £238.89 per month Mercedes GLC Best Car Leasing Deal from £273.12 per month  Toyota Aygo Toyota AygoBest Car Leasing Deal from £80.08 per month   Vauxhall Corsa Vauxhall CorsaBest Car Leasing Deal from £83.27 per month  Vauxhall Astra Vauxhall AstraBest Car Leasing Deal from £111.95 per month  Ford Focus Ford FocusBest Car Leasing Deal from £120.32 per month  Nissan Juke Nissan JukeBest Car Leasing Deal from £127.95 per month  Audi A1 Audi A1Best Car Leasing Deal from £138.95 per month  KIA Sportage KIA SportageBest Car Leasing Deal from £142.12 per month  Volkswagen Golf Volkswagen GolfBest Car Leasing Deal from £145.46 per month  Nissan Qashqai Nissan QashqaiBest Car Leasing Deal from £149.02 per month Mercedes A ClassBest Car Leasing Deal from £157.27 per month Audi A3 Best Car Leasing Deal from £162.72 per month  BMW 3 Series BMW 3 SeriesBest Car Leasing Deal from £164.53 per month  VW Tiguan VW TiguanBest Car Leasing Deal from £177.44 per month  Mercedes C Class Mercedes C ClassBest Car Leasing Deal from £188.94 per month  BMW 5 Series BMW 5 SeriesBest Car Leasing Deal from £199.95 per month  Land Rover Evoque Land Rover EvoqueBest Car Leasing Deal from £238.89 per month  Mercedes GLC Mercedes GLCBest Car Leasing Deal from £273.12 per month  LR Discovery LR DiscoveryBest Car Leasing Deal from £437.97 per month  We Offer Exclusive No Deposit Deals Accept Good or Bad Credit History We Compare Cheapest Sale Prices We Offer New or Used Cars Exclusive Low Rates & Deals No Obligation Instant Quotes Time4Leasing Support Animal Charities We sponsor the Wyndley Squash Team Our Staff raised £6,344 for Red Nose Day Exclusive Car Leasing Offers, Flexible Terms, Lowest Rates and Part Ex. Welcomed We Offer Exclusive No Deposit Deals Accept Good or Bad Credit History We Compare Cheapest Sale Prices We Offer New or Used Cars Exclusive Low Rates & Deals No Obligation Instant Quotes Time4Leasing Support Animal Charities We sponsor the Wyndley Squash Team Our Staff raised £6,344 for Red Nose Day Exclusive Car Leasing Offers, Flexible Terms, Lowest Rates and Part Ex. Welcomed Economic Hatchbacks SUV 4×4 Executive Family Estates Automatics 7 Seaters Sport Cars Vans Whether you are looking for business leasing, short or a long term car rental, you have good or bad credit, we offer great deals. We supply brand new, nearly new and approved used cars that are in stock for immediate nationwide delivery at unbeatable lease prices. Why Lease Your Next Car from Time4Leasing? Whether you choose brand new, nearly new, second hand or ex demo no deposit car leasing, we offer some of the most popular finance methods to obtain the car of your dreams, even if it is your fist time. We provide Contract Hire Leasing, Personal Contract Purchase Sales or Hire Purchase where you can drive unlimited miles and keep the car for free at the end of the lease. Along with other finance arrangements they are designed for company and ex-company car drivers or individuals living and working in the UK with or without a car allowance. Our sale prices are far cheaper than anywhere else because we work directly with the best vehicle dealers and leasing brokers. We get the low-down finance deals on the latest offers from industry insiders, then we double-check these prices with independent sources, making sure you receive the cheapest possible price and best service. |